
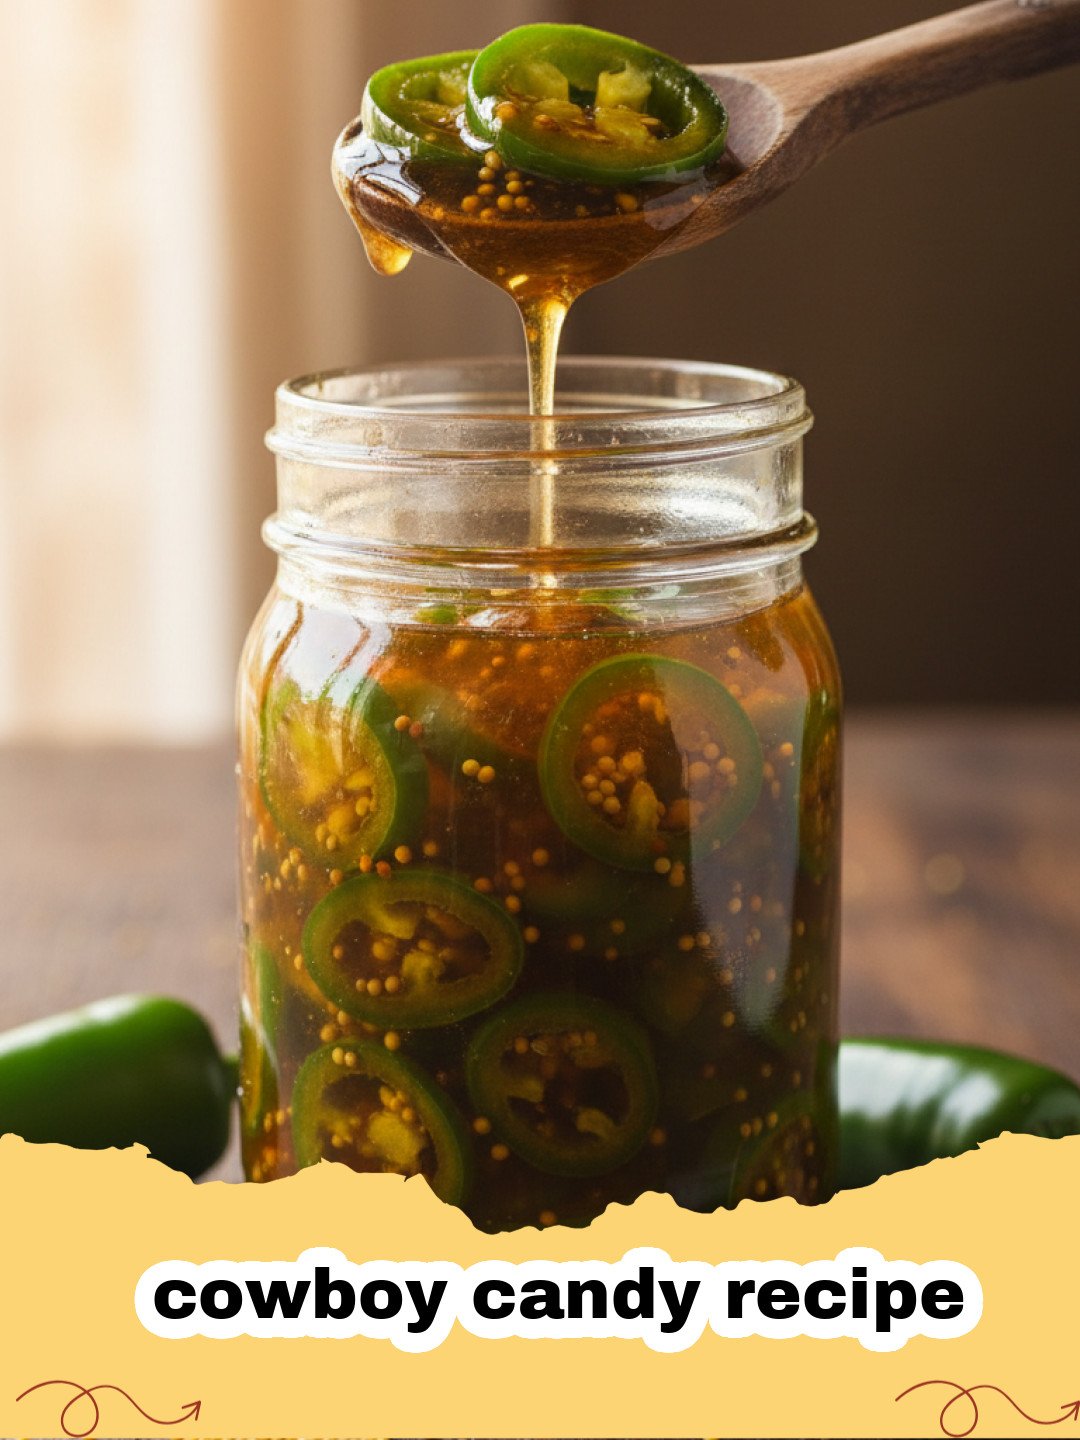
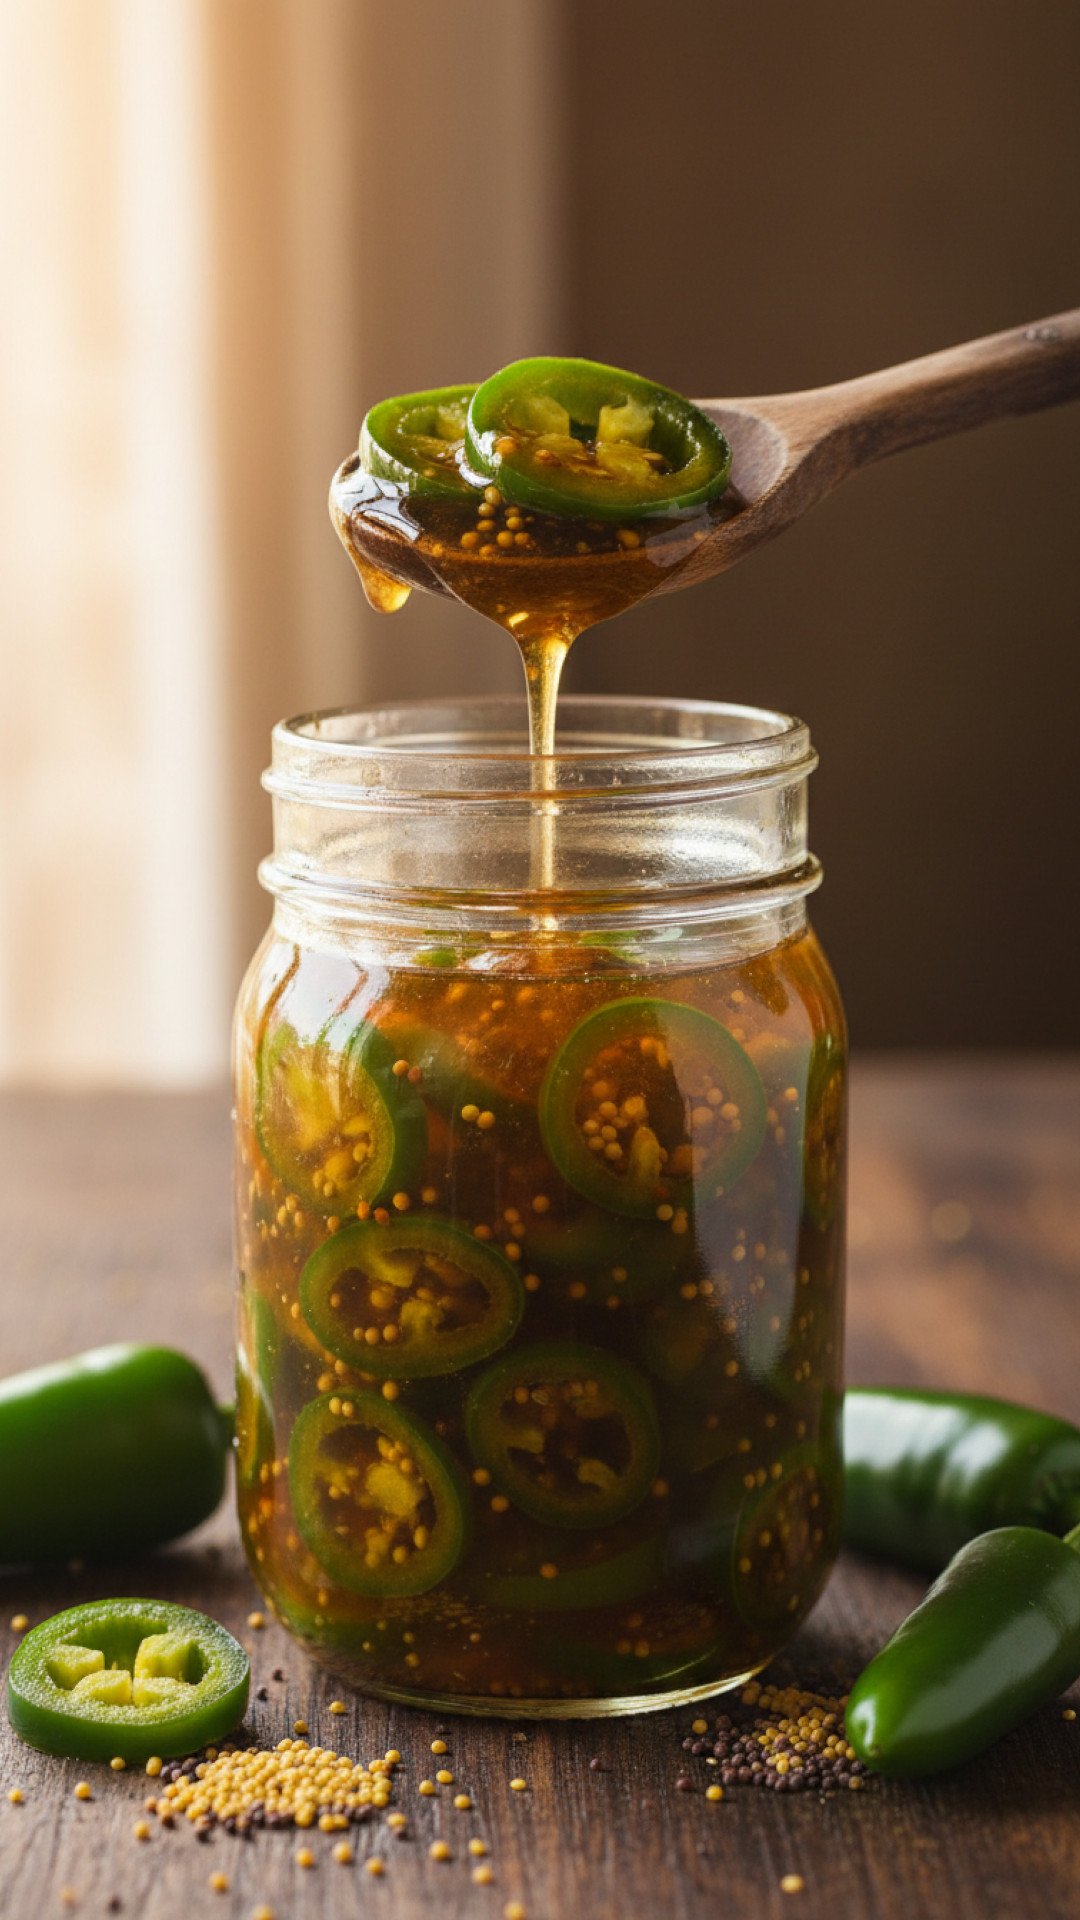
My earliest memory of true culinary magic wasn't some fancy restaurant dish, but a jar of what my grandma lovingly called "cowboy candy." This incredible cowboy candy recipe combines the fiery kick of jalapeños with a sweet, tangy syrup, creating an addictive condiment that transforms any meal. I remember being a kid, cautiously reaching for a tiny slice, convinced it would be too hot. But then, the initial warmth would give way to a burst of sugary sweetness, leaving me utterly captivated. It was the perfect balance, a playful dance of flavors that made humble hot dogs feel gourmet and elevated simple cream cheese to an appetizer star. Grandma always had a batch on hand, neatly lined up in her pantry, ready to bestow its unique charm upon whatever dish graced her table. That nostalgic taste is what inspired me to perfect my own cowboy candy recipe, ensuring that same magic could be shared with my family and, now, with you. This isn't just a recipe; it's a jar full of memories, a testament to how simple ingredients can create something extraordinary. It's a sweet, spicy, and tangy delight that will become a staple in your kitchen, just as it has in mine.
Why This Cowboy Candy Recipe is a Must-Try
Flavor Explosion in Every Bite
The beauty of this cowboy candy recipe lies in its complex flavor profile. It's a harmonious blend of sweet, spicy, and tangy, making it incredibly versatile. The initial heat from the jalapeños is quickly mellowed by the sugary syrup, leaving a delightful warmth on your palate. It’s an unforgettable taste experience!
Incredibly Versatile Condiment
Once you make this cowboy candy recipe, you'll find endless ways to enjoy it. It's fantastic on everything from grilled cheese sandwiches and hot dogs to tacos and burgers. Stir it into dips, dollop it over cream cheese for an instant appetizer, or even add it to glazes for roasted meats. The possibilities are truly limitless with this amazing cowboy candy recipe.
Surprisingly Easy to Make
Don't be intimidated by the idea of making your own preserves. This cowboy candy recipe is straightforward and requires no special canning equipment beyond clean jars. With just a few common ingredients and a bit of simmering time, you'll have jars of this liquid gold ready to enjoy. It's a rewarding project that yields delicious results every time you follow this cowboy candy recipe.
Perfect for Gifting (or Hoarding!)
Homemade cowboy candy makes an excellent gift for friends, family, or neighbors. Package it in pretty jars with a ribbon, and you've got a thoughtful, edible present. Or, if you're like me, you'll want to keep every single jar of this delicious cowboy candy recipe all to yourself – it’s that good!
Key Ingredient Notes for the Best Cowboy Candy
Getting the best results from your cowboy candy recipe starts with understanding your ingredients. Here are a few crucial notes to ensure your candied jalapeños turn out perfectly.
Fresh Jalapeños
The star of our cowboy candy recipe! Choose firm, bright green jalapeños. Avoid any that are soft, shriveled, or have dark spots. While some people prefer to remove all seeds and membranes for less heat, I recommend leaving a few in for that authentic sweet-and-spicy kick. Remember, the heat level can vary greatly between individual peppers, so taste a tiny piece of one before you start if you're concerned. And a pro tip: always wear gloves when slicing a large quantity of jalapeños for your cowboy candy recipe to protect your hands from the capsaicin oils!
Quality Apple Cider Vinegar
Apple cider vinegar is essential for the tangy balance in this cowboy candy recipe. Don't substitute with white vinegar, as its flavor profile is too sharp. The slight sweetness and fruitiness of apple cider vinegar complement the jalapeños and sugar beautifully, creating that signature sweet and sour foundation for our cowboy candy. Opt for a good quality brand – it makes a difference in the final taste of your cowboy candy recipe.
Granulated Sugar
While the sugar provides sweetness, it also acts as a crucial preservative in this cowboy candy recipe. It creates the thick, syrupy consistency that coats the jalapeños and allows them to be stored for extended periods. Do not reduce the amount of sugar significantly, as it affects both the flavor balance and the preservation qualities of your cowboy candy. The sugar transforms the fiery peppers into something truly magical and sweet, making this cowboy candy recipe so irresistible.
Step-by-Step Guide with Pro Tips for Your Cowboy Candy Recipe
Let's get cooking! Follow these detailed steps to create your own batch of incredible cowboy candy. This cowboy candy recipe is designed to be easy and delicious.
- Step 1: Prepare Your Jalapeños. First, thoroughly wash about 2 pounds of fresh jalapeños. While wearing gloves (seriously, don't skip this!), slice the jalapeños into ¼-inch thick rounds. You can use a sharp knife or a mandoline for uniform slices. Discard the stems. If you prefer less heat in your cowboy candy, you can remove some of the seeds and membranes, but I like to leave most in for that classic cowboy candy recipe punch.
- Step 2: Brine the Jalapeños (Optional, but Recommended). Place the sliced jalapeños in a large bowl and sprinkle generously with about 1 tablespoon of salt. Cover with cold water and let them sit for at least an hour, or up to overnight in the refrigerator. This brining step helps draw out some of the excess water, resulting in crisper cowboy candy. Drain and rinse the jalapeños thoroughly under cold water, then pat them very dry with paper towels.
- Step 3: Prepare the Syrup. In a large, non-reactive pot (stainless steel is best), combine 2 cups of apple cider vinegar, 5 cups of granulated sugar, 1 teaspoon of garlic powder, ½ teaspoon of cayenne pepper (for an extra kick!), and ½ teaspoon of ground turmeric (for color and flavor). Bring the mixture to a rolling boil over medium-high heat, stirring constantly until the sugar is completely dissolved. This forms the base of your delicious cowboy candy recipe.
- Step 4: Simmer the Jalapeños. Once the syrup is boiling and clear, add the drained and dried jalapeño slices to the pot. Reduce the heat to a simmer and cook for about 5-7 minutes, stirring occasionally. The jalapeños will change color from bright green to a duller olive green and soften slightly, but they should still retain a bit of their bite. Be careful not to overcook them, or they'll become mushy.
- Step 5: Remove and Reduce Syrup. Using a slotted spoon, carefully remove the jalapeño slices from the pot and transfer them into sterilized pint jars, leaving about ½ inch of headspace. This ensures a good seal for your cowboy candy.
- Step 6: Finish the Syrup. Return the pot with the remaining syrup to medium-high heat. Bring it back to a boil and let it boil vigorously for 5-10 minutes, or until the syrup has thickened slightly. It should coat the back of a spoon. The longer you boil, the thicker your cowboy candy syrup will be. This reduction concentrates the flavors, making the cowboy candy recipe even more impactful.
- Step 7: Jar and Seal. Carefully pour the hot, thickened syrup over the jalapeños in the jars, ensuring they are completely submerged. Tap the jars gently to release any air bubbles. Wipe the rims of the jars clean, apply the lids, and screw on the bands until finger-tight. Allow the jars of cowboy candy to cool completely on your counter. As they cool, you should hear a "pop" as the lids seal, indicating proper preservation. Store sealed jars in a cool, dark place for up to a year. Once opened, refrigerate and consume within 2-3 weeks. This simple cowboy candy recipe will make you feel like a canning pro!
Variations & Serving Suggestions for Your Cowboy Candy
This cowboy candy recipe is fantastic on its own, but it's also incredibly versatile. Here are some ideas to switch things up and enjoy your homemade candied jalapeños.
Flavor Variations:
- Smoky Cowboy Candy: Add a teaspoon of smoked paprika or a dash of liquid smoke to the syrup for a deeper, smoky flavor.
- Herbal Twist: Infuse the syrup with a sprig of fresh thyme or a bay leaf during the simmering process. Remove before jarring for a subtle herbal note in your cowboy candy.
- Garlic Lover's Dream: Increase the garlic powder or add a few minced fresh garlic cloves to the syrup.
- Extra Heat: For those who crave more fire, toss in a pinch of red pepper flakes or a quarter teaspoon of cayenne pepper (or more!) along with the other spices when making your cowboy candy recipe.
Serving Suggestions:
- **Cream Cheese & Crackers:** This is a classic for a reason! Pour a generous amount of cowboy candy over a block of cream cheese and serve with your favorite crackers. It's an effortless and incredibly popular appetizer.
- **Burgers & Hot Dogs:** Elevate your grilled favorites by adding a spoonful of cowboy candy. The sweet and spicy kick cuts through the richness of the meat perfectly.
- **Tacos & Nachos:** A dollop of cowboy candy adds a fantastic layer of flavor and texture to any Mexican-inspired dish.
- **Sandwiches & Wraps:** Give your deli sandwiches or turkey wraps a gourmet upgrade with a few slices of cowboy candy.
- **Eggs:** Spoon some cowboy candy over scrambled eggs, omelets, or even a breakfast burrito for a surprising and delicious morning kick.
- **Pork & Chicken:** Use the syrup as a glaze for roasted pork loin or grilled chicken. The sweet and tangy notes are a perfect complement. You could even pair it with dishes like this Effortless Sheet Pan Lemon Herb Chicken and Summer Vegetables for an unexpected twist.
- **Dips:** Stir finely chopped cowboy candy into your favorite dips, like a savory hummus or a creamy onion dip. It would even be amazing mixed into a classic like The Ultimate Vibrant Green Goddess Pool Dip.
- **Cocktails:** A tiny splash of the syrup can add a unique sweet and spicy element to margaritas or other tequila-based drinks.
Remember, properly stored cowboy candy in a sealed glass jar will last for months. I highly recommend using quality Basics Glass Food Storage containers for safe and organized pantry storage of this wonderful cowboy candy recipe!
Nutrition Information
| Nutrition Facts (per serving) | |
|---|---|
| Calories | 65 kcal |
| Carbohydrates | 17g |
| Cholesterol | 0mg |
| Fat | 0g |
| Fiber | 1g |
| Protein | 0g |
| Saturated Fat | 0g |
| Serving Size | 1.5 tbsp (20g) |
| Sodium | 5mg |
| Sugar | 16g |
| Trans Fat | 0g |
| Unsaturated Fat | 0g |
Conclusion
There you have it – the ultimate cowboy candy recipe, ready to transform your pantry and your palate. This sweet, spicy, and tangy condiment is more than just preserved jalapeños; it's a jar of pure joy, a versatile secret weapon for your kitchen, and a fantastic way to enjoy garden-fresh peppers. Whether you're making it for yourself, for gifts, or to impress at your next gathering, this cowboy candy recipe is guaranteed to be a hit. So grab your gloves, slice those jalapeños, and get ready to experience the magic of homemade cowboy candy. Happy cooking!
FAQs
What is cowboy candy?
Cowboy candy, also known as candied jalapeu00f1os, is a sweet and spicy condiment made from sliced jalapeu00f1o peppers that are cooked in a sugary, tangy syrup, typically with apple cider vinegar. It's incredibly versatile and adds a unique flavor to many dishes.
How long does cowboy candy last?
When properly canned and sealed, cowboy candy can last for up to a year in a cool, dark pantry. Once a jar is opened, it should be refrigerated and consumed within 2-3 weeks for the best quality and safety.
Do I need to wear gloves when making this cowboy candy recipe?
Yes, it is highly recommended to wear gloves when slicing jalapeu00f1os, especially if you're sensitive to capsaicin. This prevents the spicy oils from irritating your skin or accidentally transferring to your eyes, which can be quite uncomfortable.
Can I adjust the spiciness of this cowboy candy recipe?
Absolutely! For less heat, you can remove more of the seeds and membranes from the jalapeu00f1os before cooking. For more heat, you can leave all the seeds in or even add a pinch of cayenne pepper to the syrup. Always taste a small piece of a jalapeu00f1o before you start to gauge its natural heat level.

Sweet and Spicy Cowboy Candy (Candied Jalapeños)
This incredible cowboy candy recipe combines the fiery kick of jalapeños with a sweet, tangy syrup, creating an addictive condiment that transforms any meal. Perfect for burgers, cream cheese, and so much more!
- Total Time: 40 minutes
- Yield: Approximately 4 pint jars 1x
Ingredients
2 lbs fresh jalapeño peppers
1 tbsp salt (for brining, optional)
2 cups apple cider vinegar
5 cups granulated sugar
1 tsp garlic powder
½ tsp cayenne pepper (optional, for extra heat)
½ tsp ground turmeric
Instructions
Step 1: Prepare Your Jalapeños. First, thoroughly wash about 2 pounds of fresh jalapeños. While wearing gloves (seriously, don't skip this!), slice the jalapeños into ¼-inch thick rounds. You can use a sharp knife or a mandoline for uniform slices. Discard the stems. If you prefer less heat in your cowboy candy, you can remove some of the seeds and membranes, but I like to leave most in for that classic cowboy candy recipe punch.
Step 2: Brine the Jalapeños (Optional, but Recommended). Place the sliced jalapeños in a large bowl and sprinkle generously with about 1 tablespoon of salt. Cover with cold water and let them sit for at least an hour, or up to overnight in the refrigerator. This brining step helps draw out some of the excess water, resulting in crisper cowboy candy. Drain and rinse the jalapeños thoroughly under cold water, then pat them very dry with paper towels.
Step 3: Prepare the Syrup. In a large, non-reactive pot (stainless steel is best), combine 2 cups of apple cider vinegar, 5 cups of granulated sugar, 1 teaspoon of garlic powder, ½ teaspoon of cayenne pepper (for an extra kick!), and ½ teaspoon of ground turmeric. Bring the mixture to a rolling boil over medium-high heat, stirring constantly until the sugar is completely dissolved. This forms the base of your delicious cowboy candy recipe.
Step 4: Simmer the Jalapeños. Once the syrup is boiling and clear, add the drained and dried jalapeño slices to the pot. Reduce the heat to a simmer and cook for about 5-7 minutes, stirring occasionally. The jalapeños will change color from bright green to a duller olive green and soften slightly, but they should still retain a bit of their bite. Be careful not to overcook them, or they'll become mushy.
Step 5: Remove and Reduce Syrup. Using a slotted spoon, carefully remove the jalapeño slices from the pot and transfer them into sterilized pint jars, leaving about ½ inch of headspace. This ensures a good seal for your cowboy candy.
Step 6: Finish the Syrup. Return the pot with the remaining syrup to medium-high heat. Bring it back to a boil and let it boil vigorously for 5-10 minutes, or until the syrup has thickened slightly. It should coat the back of a spoon. The longer you boil, the thicker your cowboy candy syrup will be. This reduction concentrates the flavors, making the cowboy candy recipe even more impactful.
Step 7: Jar and Seal. Carefully pour the hot, thickened syrup over the jalapeños in the jars, ensuring they are completely submerged. Tap the jars gently to release any air bubbles. Wipe the rims of the jars clean, apply the lids, and screw on the bands until finger-tight. Allow the jars of cowboy candy to cool completely on your counter. As they cool, you should hear a "pop" as the lids seal, indicating proper preservation. Store sealed jars in a cool, dark place for up to a year. Once opened, refrigerate and consume within 2-3 weeks. This simple cowboy candy recipe will make you feel like a canning pro!
Notes
Always wear gloves when handling jalapeños to protect your skin from irritation. For crisper results, don't skip the optional brining step. Adjust cayenne pepper to your preferred heat level.
- Prep Time: 20 minutes
- Cook Time: 20 minutes
- Category: Drinks, Snacks & Holiday Treats
- Cuisine: American
Nutrition
- Serving Size: 1.5 tbsp (20g)
- Calories: 65 kcal
- Sugar: 16g
- Sodium: 5mg
- Fat: 0g
- Saturated Fat: 0g
- Unsaturated Fat: 0g
- Trans Fat: 0g
- Carbohydrates: 17g
- Fiber: 1g
- Protein: 0g
- Cholesterol: 0mg
Leave a Reply